Quantcast
Channel: Citrix / Terminal Services / Remote Desktop Services – Helge Klein
Viewing all 38 articles
Browse latest View live

How WinPE 4.0 Breaks ICA Connections

$
0
0

I had to troubleshoot a case where it suddenly was not possible any more to connect via ICA/HDX to freshly installed Windows 7 VDI machines. As it turned out, the root cause was a combination of Microsoft disabling legacy technologies and Citrix relying on them.

The Problem

Connecting to a VDI machine, newly installed with the Windows 7 corporate image, failed with the infamous “status 1030″ error:

The connection to ‘desktop name’ failed with status 1030

‘Status 1030′ is what the ICA client will report for nearly any type of problem, which unnecessarily complicates troubleshooting a lot – are individual error codes per problem type too much to ask?

Strangely, the machines were registered with the DDC and all looked well.

Troubleshooting steps

The application event log of the virtual desktop had no errors and the connection failed from different user accounts on different PCs. Obviously the connection target was the problem, not the source.

I started troubleshooting by enabling PortICA logging (PortICA is the original name of the ICA port from server to client OS). The next failed connection attempt yielded interesting entries in the log file which culminated in the following:

Trace5: Citrix.Portica.GinaServer.SendMessageToGina Failed to open PicaGina event. Give up.

Looking at the message text one might come to the conclusion that sending a message to a software component that is no longer present is bound to fail, but I searched for the message text anyway. And found CTX133773 which explains exactly what I was seeing.

The VDA’s setup relies on the existence of 8.3 names in the file system. When those are not present, the setup stores the regular path to mfaphook64.dll in the registry. Since C:\Program Files\Citrix\System32\mfaphook64.dll has a blank in it, mfaphook64.dll, the Citrix component that does all the “dirty” work, cannot be loaded, rendering the VDA installation useless.

Root Cause

Having an explanation for the failed connection attempts was nice, but the most important question was not answered yet: how come 8.3 names were not available any more all of a sudden? After all, up to a few days earlier things had worked just nicely.

My first suspicion that 8.3 names had been switched off via Group Policy turned out to be incorrect. As I found out, 8.3 names can not only be configured per system but also per volume.

And, sure enough, I got this when I queried the state of 8.3 names on C:

C:\>fsutil 8dot3name query c:
The volume state is: 1 (8dot3 name creation is disabled).
The registry state is: 2 (Per volume setting - the default).
 
Based on the above two settings, 8dot3 name creation is disabled on c:

The only possible reason for 8.3 names not being enabled on the volume C: could have been a change to the imaging or deployment process. After some more searching we found the culprit. Its name: WinPE 4.0. Apparently Microsoft disabled 8.3 names in WinPE 4.0 by default – without telling anyone.

As we learned there had been an update of the deployment tools and the new version came with WinPE 4.0. When we moved back to the old version 8.3 names reappeared, the 1030 errors were gone and ICA connections were possible once again.

Additional Information

This issue not only affects XenDesktop (5.6) but also XenApp 6.5.

Although we do not use Microsoft’s System Center Configuration Manager (SCCM) it may be relevant to some of you that SP1 for SCCM 2012 also silently disables 8.3 names.

The post How WinPE 4.0 Breaks ICA Connections is original content of Helge Klein - Tools for IT Pros.


Script: Gracefully Shut Down all VMs on a Given Set of Hosts (VMware/XenDesktop)

$
0
0

Cleanly shutting down all virtual machines on a given set of hosts is not as trivial as it might seem – especially if you want to be able to restore the original state once the planned maintenance you are doing this for is completed.

Maintenance Tasks

These are the things that need to be done in order to prepare VMware ESXi servers hosting XenDesktop VDI machines for maintenance:

  1. Determine which VMs are present on the servers we need to shut down
  2. Put the machines in XenDesktop maintenance mode to prevent user logons
  3. Create a list of all VMs that are powered on (in order to be able to start only those when done)
  4. Initiate a clean shutdown via VMware Tools
  5. Only where the clean shutdown fails or VMware Tools are not installed: turn off the machine

The following is required to restore the original state when maintenance is finished:

  1. Power up those VMs that were running before we started
  2. Disable XenDesktop maintenance mode for all VMs

Automation

You do not have to worry about how to automate all those steps listed above. The script presented here does it all for you!

Usage

This is how you call the script:

a) Shutdown:

.\ShutdownVMsOnHost.ps1 shutdown servers.txt vCenterServer XenDesktopDDC_FQDN

b) Startup:

.\ShutdownVMsOnHost.ps1 startup servers.txt vCenterServer XenDesktopDDC_FQDN

servers.txt is a text file that you need to provide. It should contain the servers to be processed (one server name per line). vCenterServer obviously is the name of your vCenter server. XenDesktopDDC_FQDN is the fully qualified DNS name of your XenDesktop DDC (you will have more than one – one one will do).

Enjoy!

The Script ShutdownVMsOnHost.ps1

#
# Shuts down as gracefully as possible all VMs on a given set of hosts
#
 
#
# Script parameters
#
param
(
   [string] $action,
   [string] $serverFile,
   [string] $vCenter,
   [string] $DDC
)
 
 
#
# Sample usage:
#
# .\ShutdownVMsOnHost.ps1 shutdown servers.txt vCenterServer XenDesktopDDC_FQDN
#
 
 
#
# General options
#
#Requires -Version 2
Set-StrictMode -Version 2
 
 
#
# Global variables
#
 
$scriptDir = Split-Path $MyInvocation.MyCommand.Path
$logfile = $scriptDir + "\log.txt"
$runningVMs = $scriptDir + "\vms.txt"
$vmsPoweringDown = new-object system.collections.arraylist
$vmNameFilter = "*"                                         # Optionally filter the VMs to process
 
 
#
# Constants
#
# Return values
Set-Variable -Name RET_OK -Value 0 -Option ReadOnly -Force      # Successful execution
Set-Variable -Name RET_HELP -Value 1 -Option ReadOnly -Force    # The help page was printed
Set-Variable -Name RET_ERROR -Value 2 -Option ReadOnly -Force   # An error occured
 
# Log message severity
Set-Variable -Name SEV_INFO -Value 1 -Option ReadOnly -Force
Set-Variable -Name SEV_WARN -Value 2 -Option ReadOnly -Force
Set-Variable -Name SEV_ERR -Value 3 -Option ReadOnly -Force
 
 
#
# This is the real start of the script
#
function main
{
   try
   {
      if (-not (Test-Path $serverFile))
      {
         throw "File not found: $serverFile"
      }
 
      # Load snapins and modules
      LogMessage "Loading PowerShell snapins and connecting to vCenter (may take a while)..." $SEV_INFO
      LoadSnapins @("VMware.VimAutomation.Core")
      LoadSnapins @("Citrix.ADIdentity.Admin.V1")
      LoadSnapins @("Citrix.Broker.Admin.V1")
      LoadSnapins @("Citrix.Common.Commands")
      LoadSnapins @("Citrix.Configuration.Admin.V1")
      LoadSnapins @("Citrix.Host.Admin.V1")
      LoadSnapins @("Citrix.MachineCreation.Admin.V1")
      LoadSnapins @("Citrix.MachineIdentity.Admin.V1")
 
      # Connect to vCenter
      try
      {
         Disconnect-VIServer $vCenter -confirm:$false -ErrorAction SilentlyContinue
      }
      catch
      {
        # Do nothing
      }
      $script:viserver = Connect-VIServer $vCenter -NotDefault
 
      # Do it
      if ($action -eq "shutdown")
      {
         ShutdownVMs
      }
      elseif ($action -eq "startup")
      {
         StartupVMs
      }
      else
      {
         throw New-Object System.ArgumentNullException "Unknown action: $action"
      }
   }
   catch
   {
      LogMessage ("Error: " + $_.Exception.Message.ToString()) $SEV_ERR
      exit $RET_ERROR
   }
}
 
##############################################
#
# Shutdown VMs
#
##############################################
 
function ShutdownVMs ()
{
   LogMessage "========================================="
   LogMessage "`nInitiating shutdown...`n"
 
   # Delete the VM file
   if (Test-Path $runningVMs)
   {
      Remove-Item $runningVMs
   }
 
   # Process each server in the list
   get-content $serverFile | foreach {
 
      if ([string]::IsNullOrEmpty($_))
      {
         return;  # Next line
      }
 
      LogMessage "Server $_..."
 
      # Get all VMs on this server
      $vms = Get-VM -Location $_ -name $vmNameFilter -Server $viserver -ErrorAction stop
 
      # Process each VM on this server
      foreach ($vm in $vms)
      {
         LogMessage "   VM $($vm.Name)..."
 
         # Enable XenDesktop maintenance mode
         try
         {
            Get-BrokerPrivateDesktop -MachineName "*\$($vm.Name)" -AdminAddress $DDC | Set-BrokerPrivateDesktop -InMaintenanceMode $true
         }
         catch
         {
            LogMessage ("Error while trying to enable maintenance mode: " + $_.Exception.Message.ToString()) $SEV_ERR
 
            # Next item in the foreach loop
            return
         }
 
         # Further process only VMs that are powered on
         if ($vm.PowerState -eq "PoweredOn")
         {
            # Store the running VMs
            Add-Content -path $runningVMs $vm.Name
 
            # Try a clean shutdown, if not possible turn off
            $vmView = $vm | get-view
            $vmToolsStatus = $vmView.summary.guest.toolsRunningStatus
            if ($vmToolsStatus -eq "guestToolsRunning")
            {
               $result = Shutdown-VMGuest -VM $vm -confirm:$false
               $count = $vmsPoweringDown.add($vm)
            }
            else
            {
               stop-vm -vm $vm -confirm:$false -Server $viserver
            }
         }
      }
   }
 
   # Wait until all VMs are powered down (or we reach a timeout)
   $waitmax = 3600
   $startTime = (get-date).TimeofDay
   do
   {
      LogMessage "`nWaiting 1 Minute...`n"
      sleep 60
 
      LogMessage "Checking for still running machines...`n"
 
      for ($i = 0; $i -lt $vmsPoweringDown.count; $i++)
      {
         if ((Get-VM $vmsPoweringDown[$i] -Server $viserver).PowerState -eq "PoweredOn")
         {
            continue
         }
         else
         {
            $vmsPoweringDown.RemoveAt($i)
            $i--
         }
      }
   } while (($vmsPoweringDown.count -gt 0) -and (((get-date).TimeofDay - $startTime).seconds -lt $waitmax))
 
   # Shut down still running VMs
   if ($vmsPoweringDown.count -gt 0)
   {
      LogMessage "Powering down still running machines...`n"
 
      foreach ($vmName in $vmsPoweringDown)
      {
         $vm = Get-VM $vmName -Server $viserver
         if ($vm.PowerState -eq "PoweredOn") {
            Stop-VM -vm $vm -confirm:$false -Server $viserver
         }
      }
   }
 
   LogMessage "`nDone!`n"
}
 
##############################################
#
# Startup VMs
#
##############################################
 
function StartupVMs ()
{
   LogMessage "========================================="
   LogMessage "`nInitiating startup...`n"
 
   # Startup VMs that were previously running
   get-content $runningVMs | foreach {
 
      if ([string]::IsNullOrEmpty($_))
      {
         return;  # Next line
      }
 
      # Get the VM
      $vm = Get-VM -name $_ -Server $viserver
 
      # Start the VM
      Start-VM -vm $vm -confirm:$false -Server $viserver
   }
 
   # Disable XenDesktop maintenance mode for all VMs
   get-content $serverFile | foreach {
 
      # Get all VMs on this server
      $vms = Get-VM -Location $_ -name $vmNameFilter -Server $viserver
 
      # Process each VM on this server
      foreach ($vm in $vms)
      {
         # Disable XenDesktop maintenance mode
         try
         {
            Get-BrokerPrivateDesktop -MachineName "*\$($vm.Name)" -AdminAddress $DDC | Set-BrokerPrivateDesktop -InMaintenanceMode $false
         }
         catch
         {
            LogMessage ("Error while disabling maintenance mode: " + $_.Exception.Message.ToString()) $SEV_ERR
 
            # Next item in the foreach loop
            return
         }
      }
   }
 
   LogMessage "`nFertig!`n"
}
 
##############################################
#
# LogMessage
#
##############################################
 
function LogMessage ([String[]] $messages)
{
 
   $timestamp = $([DateTime]::Now).ToString()
 
   foreach ($message in $messages)
   {
      if ([string]::IsNullOrEmpty($message))
      {
         continue
      }
 
      Write-Host "$message"
 
      $message = $message.Replace("`r`n", " ")
      $message = $message.Replace("`n", " ")
      Add-Content $logFile "$timestamp $message"
   }
}
 
##############################################
#
# LoadSnapins
#
# Load one or more PowerShell-Snapins
#
##############################################
 
function LoadSnapins([string[]] $snapins)
{
   $loaded = Get-PSSnapin -Name $snapins -ErrorAction SilentlyContinue | % {$_.Name}
   $registered = Get-pssnapin -Name $snapins -Registered -ErrorAction SilentlyContinue  | % {$_.Name}
   $notLoaded = $registered | ? {$loaded -notcontains $_}
 
   if ($notLoaded -ne $null)
   {
      foreach ($newlyLoaded in $notLoaded)
	  {
         Add-PSSnapin $newlyLoaded
      }
   }
}
 
 
##############################################
#
# Start the script by calling main
#
##############################################
 
main

The post Script: Gracefully Shut Down all VMs on a Given Set of Hosts (VMware/XenDesktop) is original content of Helge Klein - Tools for IT Pros.

Shutting Down Unused Persistent XenDesktop VMs

$
0
0

When you use XenDesktop the only way it makes sense you may find that Citrix has not really put much effort into making that a smooth experience.

Persistent is a Second-Grade Citizen

XenDesktop is really designed to be used with pooled desktops – machines that are reset to a pristine state when the user logs off. Of course, stateless desktops are much better (and, importantly, cheaper) served from XenApp. This has been the topic of many a debate which I will not repeat here. But I will state that if you give a so-called knowledge worker a personal desktop, you better make sure that desktop is persistent.

Reality is merely an illusion, albeit a very persistent one. – Albert Einstein

Automatic Shutdown?

One of the many things that should be automatic but are not is power management. To be more exact: shutdown of unused private desktops (in XenDesktop 5.6). Although that capability is built into XenDesktop, it is de facto broken. Why? It only turns off machines that have been idle for a certain amount of time after a user logged off. That is all well, but what if you turn on all machines for patching and virus scanning regularly? In that case, XenDesktop power management remains inactive and machines never get shut down – turned on once, running forever.

Unlimited Disk, Limited RAM

If you have disk deduplication in place – which is practically a necessity with persistent desktops – you can create a nearly unlimited number of machines. Many more than you can run concurrently because you would run out of RAM. Why you would do that? Think test environment, where you probably only have a server or two, but everybody and his sister want a VM for the once a quarter application test they need to perform. In order for that scenario to work well, VMs that have not been used for some time need to be powered down or you will quickly run into the situation that RAM is exhausted and users complain because their VMs cannot be powered on when they try to connect.

So, what do we do when a product does not work the way we expect it to? We script our way around it!

DIY

Here is my simple script ShutdownUnusedVMs.ps1 which shuts down VMs that meet certain criteria:

  • Last connection at least 8 hours ago
  • No user currently connected
  • VMware Tools installed (otherwise the machine could only be turned off)

Configure the script to run as a scheduled task on a regular basis and the number of concurrently running machines should stay within reasonable limits. Just make sure to run it from a user account that has the appropriate permissions in XenDesktop and vSphere.

#
# ShutdownUnusedVMs by Helge Klein
#
 
#
# Variables that must be adjusted prior to use
#
$vCenter = "Name of your vCenter server"
$DDC = "Name of your XenDesktop DDC"
 
# Add the required snapins
Add-PSSnapin vmware.vimautomation.core
Add-PSSnapin citrix.*
 
# Connect to vCenter
Connect-VIServer $vCenter
 
# Define how long ago the last connection must have been for the VM to be considered for shutdown
$earliestTime = (Get-Date).AddHours(-8)
 
# Get the XenDesktop machine objects whose last connection time is long enough in the past and which are not in use
$xdMachinesToShutdown = Get-BrokerDesktop -AdminAddress $DDC | where {$_.LastConnectionTime -lt $earliestTime -and $_.PowerState -eq "on" -and $_.SummaryState -ne "InUse" -and $_.SummaryState -ne "Disconnected"}
 
# Log
$xdMachinesToShutdown | select HostedMachineName, LastConnectionTime, AssociatedUserFullNames | ft -AutoSize -Wrap | Out-File -Force .\xdMachinesToShutdown.txt
 
# Get the VMs to shutdown
$vmsToProcess = new-object system.collections.arraylist
foreach ($xdMachine in $xdMachinesToShutdown) {if ((Get-VM $xdMachine.HostedMachineName | get-view).summary.guest.toolsRunningStatus -eq "guestToolsRunning") {$vmsToProcess.add((Get-VM $xdMachine.HostedMachineName))}}
 
# Log
$vmsToProcess | select Name | ft -AutoSize -Wrap | Out-File  -Force .\vmsToShutdown.txt
 
# Shutdown
foreach ($vm in $vmsToProcess) {Get-VM $vm | Shutdown-VMGuest -Confirm:$false}

The post Shutting Down Unused Persistent XenDesktop VMs is original content of Helge Klein - Tools for IT Pros.

Persistent VDI in the Real World – Architecture

$
0
0

This is the first article in a multi-part series about building and maintaining an inexpensive scalable platform for VDI in enterprise environments.

Requirements

Before we can even start to think about a possible architecture, we need requirements. Only requirements enable us to make choices that benefit the customer. Without proper requirements we are not building for the real world but for some alternate reality. Please keep in mind when reading this article that the solution presented here only makes sense for you if your requirements are similar.

These are the requirements we need to work with:

  • The customer wants to virtualize desktop PC workloads typically found in larger enterprises.
  • VDI is not going to be the only platform. Citrix XenApp is and will be the most important platform. Additionally there will be laptops and potentially desktop PCs.
  • Operations/management costs should be kept at a reasonable level.
  • Hardware costs should be kept low, but servers need to be bought from the preferred supplier, which is HP.
  • Availability should be similar to traditional desktop PCs.
  • Performance should not be worse than with the current three year old desktop PCs.

Choosing a Broker

With Citrix XenApp already in use today and even more so in the future, it makes a lot of sense to choose XenDesktop as the broker for VDI. Today’s deployments benefit from combined licensing infrastructure and user-facing components (client, web portal, remote access). Tomorrow’s installations will come even closer together due to the face that XenApp’s IMA architecture has been swapped out for XenDesktop’s FMA in XenDesktop 7.x and XenApp becoming a part of XenDesktop (called “App Edition”).

Pooled or Persistent?

The answer to this is already in the title, so I am going to keep this section short. Let me just say that there are very few use cases where pooled VDI makes sense in organizations that have already deployed server-based computing (SBC). Either give users a stateless desktop on a terminal server where only individual settings are retained but the system configuration cannot be changed or give them a machine that keeps any changes in between logons. If you choose the latter, do not simulate persistence by adding tools like Citrix Personal vDisk to a pooled desktop: this only increases the complexity and makes the resulting system much more difficult to maintain. Go for full persistence instead, where there is one VM per user without any differencing or secondary disks. You will be rewarded by having an architecture that is simple, stable, well understood and can be managed by the myriad of PC management tools out there.

32-Bit or 64-Bit?

An article on the Citrix Blogs discussed this and recommended to use the 32-bit version of Windows 7 with VDI. I must say it left me speechless. Why anyone would not go for the 64-bit version of Windows is beyond me. Luckily most people seem to agree with me. From my experience these are the killer arguments for x64:

  1. One platform for laptops and VDI: you are not using 32-bit for your fat clients, are you? And, trust me: you do not want to manage VDI differently, just because it is virtual. A PC is a PC.
  2. Flexibility: This is the major advantage a virtual desktop has over a physical PC (no, price is not). Being able to add RAM to a machine when the workload requires it is an important part of that flexibility. With 32-bit you are throwing this advantage away since it caps the usable amount of RAM at approximately 3.5 GB.

Conclusion of Part 1

Given the requirements listed above, it makes a lot of sense to complement XenApp with XenDesktop. Since there is already a stateless platform in place that suits simpler use cases very well (XenApp), we build XenDesktop in such a way that it is able to fully replace a desktop PC by making it persistent. In order to leverage all the advantages VDI has to offer we install the 64-bit version of Windows.

In the next installment of this series I will explain how to solve the storage problem. Stay tuned!

The post Persistent VDI in the Real World – Architecture is original content of Helge Klein - Tools for IT Pros.

Persistent VDI in the Real World – Storage

$
0
0

This is the second article in a multi-part series about building and maintaining an inexpensive scalable platform for VDI in enterprise environments.

Previously in this Series

I started this series by defining requirements. Without proper requirements, everything else is moot. Remember that we are looking at running typical enterprise desktop workloads, we are trying to centralize desktops and our primary desktop hosting technology is multi-user Windows, aka RDS/XenApp.

Since we already have stateless desktops with XenApp we chose to make the VDI machines persistent. We also selected the 64-bit version of Windows over 32-bit because that enables us to use the same image for both physical and virtual desktops.

Storage – Shared or Local?

One of the most important architecture decisions is where to store the virtual machines: in some sort of shared storage, accessible by all virtualization hosts, or locally on each hypervisor.

Shared Storage

Shared storage typically means SAN, which in turns means expensive. What do you get for all that money? Certainly breathtaking speed, right? Well, not really. Traditional SANs are actually not that fast, especially not if they are based on magnetic disks only. And there is one really big problem many people are not aware of: IOPS starvation.

IOPS are the one thing you cannot have enough of. More IOPS directly translate to a snappier end user experience. The opposite is also true: poor IOPS performance in the SAN invariably causes hangs and freezes on the virtual desktop.

With many VMs competing for resources, a SAN is susceptible to denial of service conditions where a small number of machines generate such a high load that the performance is severely degraded for all. The answer is quality of service, where each VM gets guaranteed minimum and maximum IOPS values and is allowed the occasional burst. However, when implementing QoS great care must be taken not to create a condition where IOPS distribution across machines is fair but end user experience is equally bad for all.

In addition to these technical aspects there is the administration side of things. If you ask a typical SAN admin how many IOPS he can guarantee for your VDI project you may not get a satisfatory answer. And nothing stops him from putting more workloads on his box after your PoC is long over. Heck, the exchange admin, whose machines are in the same SAN as yours, could decide it is time to ugrade to a newer version which coincidentally generates twice as many IOs as before, tipping the delicate balance and causing IOPS starvation for all.

To summarize: shared SAN storage is expensive and you, the VDI guy, are not in control. Stay away from it.

Local Storage

The logical alternative to shared SAN storage is to use disks installed locally in the virtualization hosts. Even enterprise SAS disks are relatively cheap (at least compared to anything with the word SAN in its name), high load on one server does not impact the performance of any other host, and you, the VDI guy, are king. You can tune the system for VDI and make sure nothing else interferes with your workload.

Deduplication and IO Optimization

You still need many IOPS, though. And you need a lot of space (remember, we are talking about persistent VDI). With 40 VMs per server and 100 GB VM disks the net space required is 4 TB. That is enough to make us wish for deduplication. After all, most of the bits stored in the VMs are identical. They all have the same OS and, to a large extent, the same applications. Deduplication reduces the required disk space by storing duplicate blocks only once. This allows for huge space savings with persistent VDI: 90% and more is not unusual.

There are two ways deduplication can be implemented: inline or post-process. The former describes a technology where the data is deduplicated in memory before it is written to disk. The latter stands for a system where the data already stored on disk is analyzed and deduplicated after having been written. Both variants have their merits.

I have gained experience with Atlantis Ilio, which is an inline deduplication product. In a typical configuration it runs as a virtual appliance on each host. Each host’s disk IO goes through its Ilio VM, allowing Ilio to perform deduplication and additional IO optimization which reduces the IOPS going to disk to a certain degree. No postprocessing is required and data is stored in an optimized format. This happens at the expense of significant CPU and memory resources that need to be assigned to the Ilio VM and are not available to the actual workload. In other words, you trade CPU and RAM for disk space and IOPS.

Ilio Implementation Details

When implementing Ilio take the CPU and RAM requirements very seriously. A reservation of two physical CPU cores for Ilio is the minimum for any decently sized VDI host. Three or four do not hurt, either. The same applies to RAM: better err on the safe side by adding a few gigabytes to the resulting value from the RAM calculation formula found in Atlantis’ admin guides.

One things that helps enough to qualify as a necessity is zeroing of deleted files. Think what happens on disk: files are created, written to and deleted all the time. However, the contents of the files, the actual blocks on disk, are not removed when a file is deleted, the data simply stays where it is. This gradually reduces the effectiveness of the deduplication. Luckily the solution is simple: from time to time zero the blocks on disk occupied by deleted files.

RAID Level and Number of Disks

Even with an IO optimization tool like Ilio you need as many disks as you can get. But you do not need much space. 1 TB per host is more than enough for 40 VMs. The number 40 is not being used randomly here, it marks the practical limit for contemporary two-processor servers.

Regarding the RAID level, we need something that is good at writes. RAID 5 is out of the question since each disk write causes two write IOs: one for the actual data, the other for the parity information. We use RAID 10 instead, which is the only standard RAID level that offers both good write performance and high capacity. Of course, RAID 10 is an active/passive technology where only half of the disks contribute to net space and IOPS performance.

IO performance increases with the number of spindles and the disks’ rotating speed. Choose 15K disks, and install as many of them per server as possible. Since we only need 2 TB of gross space we can buy the smallest disks available, which currently are 146 GB models. Typical mid-range servers like the HP DL380 can be configured to hold as many as 25 2.5″ disks. Take advantage of that!

Why not use SSDs?

After all this talk about needing IOPS, and capacity not being of paramount importance the question is obvious: why not replace many magnetic disks with few SSDs?

Before answering let me tell you that I am a huge fan of the SSD technology. In my opinion SSDs are the best thing that happened to user experience in the last five years. Not having to constantly wait while using a computer is not something you are likely to give up once you have witnessed it yourself. And with the availability of drives that combine enterprise features (hint: consistent performance) with moderate prices SSDs are definitely ready for the data center.

So what is the problem? It is as sad as it is simple: support. Larger enterprises buy their server hardware from one or two vendors only. They have support agreements which cover most aspects of hardware malfunction. If there is a problem the vendor sends a technician to replace the failed parts and everybody is happy again. That works for SSDs, too, of course, but in order to be covered by the server vendor’s support you need to buy the SSDs from HP, IBM and the likes.

The actual root cause of the problem is that server vendors gladly sell you last year’s SSDs at a price that would have been high five years ago. Both HP and IBM charge roughly $3,600 for a 400 GB enterprise SSD. For something they do not manufacture themselves but buy from someone else at a presumably much lower price and relabel in order to justify the hefty premium they are asking. It is only logical that this tactic does not help the you, the customer. The performance you get is not really great, as I found out in earlier tests.

Effectively, HP, IBM and the other big vendors are preventing wide-scale SSD adoption by forcing customers to buy overpriced products that potentially deliver sub-par performance. If you know a way out of this please let us all know by commenting below.

Conclusion of Part 2

With SAN vendors being what they are, shared storage is just too expensive. At the same time it is dangerous because at the first sign of a problem the finger-pointing is going to start (which you already know from your interaction with the network guys). You want to avoid inviting another party to the game. So local storage it is. In any case, you need some kind of deduplication technology to make persistent VDI work. Sadly, server vendors prevent us from using SSDs unless price is not much of an issue. Even then performance should be double-checked.

In the next installment of this series I will explain how to size your VDI servers. Stay tuned!

The post Persistent VDI in the Real World – Storage is original content of Helge Klein - Tools for IT Pros.

Persistent VDI in the Real World – Sizing

$
0
0

This is the third article in a multi-part series about building and maintaining an inexpensive scalable platform for VDI in enterprise environments.

Previously in this Series

In the last article I explained that shared storage should be avoided, for two reasons: it is (very) expensive, and you, the VDI guy, are not in control. The storage guys are.

With local storage, things are different. Unfortunately we cannot use SSDs, though, because the server vendor component monopoly means we only have overpriced drives of questionable origin available. Instead we use traditional spinning drives, as fast ones and as many as we can get, in a RAID 10 configuration, complemented by a deduplication and IO optimization product like Atlantis Ilio.

Virtual Hardware

Before we can start with the sizing calculations we need to know what to size for – in other words: what kind of hardware are the virtual desktops are going to get?

Our requirements state that a VM’s performance should at least be on par with a three year old desktop. Translated to virtual hardware the minimal configuration looks like this:

  1. 4 GB RAM
  2. 2 vCPUs
  3. 100 GB HDD

When reading about VDI you sometimes find numbers that are much smaller, e.g. only 2 GB RAM and 1 vCPU. Do not do that! Remember, we are talking about a full desktop replacement for knowledge workers. If you need to argue the case for more than one vCPU: do you remember what a single-core PC felt like when the virus scanner got working?

Total Capacity

With the virtual machine hardware defined, it is time to calculate the total required capacity. For that we need the number of virtual desktops we are going to provide. For the sake of simplicity let us calculate with 1,000 VDI machines. That gives us a total required capacity of:

  1. RAM: 4,000 GB
  2. vCPUs: 2,000
  3. Disk: 98 TB

Please note that this is the total capacity as seen from the virtual machines. Requirements for physical hardware are much lower because we are overcommitting CPUs and deduplicating disk space.

We do not overcommit RAM. Memory is cheap, just buy enough and avoid the severe performance degradation that occurs when pages need to be swapped out to disk.

Building Blocks

We are going to build our VDI infrastructure from self-contained building blocks without any central components that might impact scalability. This way, we can add capacity whenever we need it by simply buying another server and placing it next to the others. It is also a very simple approach (the good simple – simplicity means stability).

Selecting a Server Model

Selecting a server model can be hard, so let our requirements act as guidance:

  • The customer’s preferred supplier is HP
  • Cost is an issue

That narrows it down a bit. We need a mid-range (i.e. 2 CPU) HP server, a model that is mass produced in such high volume that the costs can be kept reasonably low.

Our storage architecture and capacity calculations indicate we need a lot of RAM and many disks. That rules out blades and 1U systems.

An additional constraint I have not talked about yet: we want Intel CPUs. AMD is (unfortunately) far behind these days, both in terms of performance per dollar as well as in performance per Watt.

The logical choice is the DL380 G8. Although only a 2U machine it can hold 25 2.5″ hard disks and 768 GB RAM. And it is pretty decently priced.

Choosing CPU, RAM and Disks

Now we need to define how we want to configure the building blocks (i.e. servers) for our VDI infrastructure.

CPU

When thinking about which CPU to order keep in mind that even though Xeon CPUs are powerful, they are not faster per core than desktop CPUs. Even the most expensive 12 core server CPU can replace at most six desktop CPUs. In other words: we need as much CPU power as we can get, both in terms of speed and number of cores.

One of the currently best-suited CPUs for VDI is the Xeon E5-2690 v2. With its 10 cores at 3.0 GHz it is among the fastest available. The Xeon E5-2697 v2 could be an interesting alternative because of its 12 cores, but it only runs at 2.7 GHz and costs nearly $600 more (list price $2,618 vs. 2,061).

RAM

As the DL380 has 24 DIMM slots one might gain the impression that more or less any amount of RAM can be configured. In reality it is more like the opposite, though: only very few configurations make sense.

The DIMM slots are organized in channels. Each CPU has four memory channels (2 CPUs -> 8 channels). For optimal performance each channel should be configured identically. That means we can only use DIMMs of identical size, and we need to configure either 8, 16 or 24 DIMMs per server. With 16 GB DIMMs we get total RAM sizes of 128, 256 or 384 GB.

We are aiming at running 30-40 VMs per server. With 4 GB per VM we need a net capacity of 160 GB per server. Configuring the servers with 256 GB seems like the reasonable thing to do. It leaves enough room for Atlantis Ilio and optional RAM upgrades for select VMs.

Disks

With deduplication disk space requirements are mainly dependent on the amount of user data stored locally in each VM. In enterprise networks, where most data is kept on file servers, this number can be fairly low. On average, 20 GB per VM should suffice. Rounding up a little a net capacity of 1 TB should do nicely. With the disks in a RAID 10 configuration a gross capacity of 2 TB is required.

We want to have as many spindles as possible, so we choose 146 GB drives, which are the smallest 15K drives available. 16 of those give us a total capacity of roughly 2 TB, just what we need. As with the RAM there is room for future expansion, which can be important if it turns out that we need more space or more spindles (= more IOPS) than anticipated.

How Many Servers?

Out of the three essential resources CPU, RAM and disk in our architecture only one is not overcommitted: RAM. That means the amount of available RAM defines the maximum capacity in terms of VMs per server.

With 256 GB per server and a (generous) reservation of 64 GB for Ilio and 12 GB for VMware we are left with 180 GB for the VMs. That amounts to a max capacity of 45 VMs per server.

In practice we want to stay below that value. For one thing we want to be able upgrade a VM’s memory upon (power) user request – after all, being able to easily adjust a machine’s specs is one of the big advantages of VDI. For another thing 45 VMs per server would result in a CPU overcommittment of 4.5:1 with the E5-2690 v2 CPU. That is on the upper end of the spectrum. Reducing the CPU overcommit ratio to 3:1 seems adequate for knowledge workers. It allows us to run 30 VMs per server. All in all we need 34 servers to host 1,000 VMs.

What About IOPS?

Did you notice that we hardly touched the IOPS topic at all? That is not because I forgot it or think it is of low importance (quite the contrary!). Instead it is due to the theoretical nature of this sizing discussion. There are several ways to size an environment and this is only one of them (for another approach see this article series). In any case it is critical you verify your assumptions and test the platform thoroughly prior to rollout. That is probably the most important step of all.

From my experience I can say that this platform performs well enough. Obviously you cannot expect SSD performance from spinning disks, not even with Ilio. If you want that you need to spend significantly more money.

The post Persistent VDI in the Real World – Sizing is original content of Helge Klein - Tools for IT Pros.

Configuring Citrix ShareFile Sync from PowerShell

$
0
0

When you have a cloud-based file sharing service it makes a lot of sense to synchronize part or all of the data with your desktop computer. Citrix ShareFile offers the Sync for Windows tool for that purpose. However, once you open its configuration screen you notice that has a severe restriction: it can only synchronize to a single local folder. In many cases it would make much more sense to synchronize different cloud folders to different locations on your hard disk. When I complained to the product manager Peter Schulz about this I learned about a hidden gem: the single folder restriction is only present in the UI; the underlying sync engine is much more flexible. And the best thing is: the sync engine can be configured from PowerShell. Here is how.

Getting Started^

The sync engine is 32-bit only, so make sure to use the 32-bit version of PowerShell for this. On 64-bit Windows it is located here:

C:\Windows\SysWOW64\WindowsPowerShell\v1.0\powershell.exe

Import the ShareFile sync engine module:

Import-Module "C:\Program Files\Citrix\ShareFile\Sync\SFSyncEngine.dll"

Listing Available Commands^

What can we do with the ShareFile sync engine PowerShell module? Let’s ask it:

PS D:\> Get-Command -Module SFSyncEngine
 
CommandType     Name                                               ModuleName
-----------     ----                                               ----------
Cmdlet          Add-SyncJob                                        SFSyncEngine
Cmdlet          Get-FileLink                                       SFSyncEngine
Cmdlet          Get-FolderIdByName                                 SFSyncEngine
Cmdlet          Get-FolderLink                                     SFSyncEngine
Cmdlet          Get-HomeFolderId                                   SFSyncEngine
Cmdlet          Get-SyncJobs                                       SFSyncEngine
Cmdlet          Get-SyncJobState                                   SFSyncEngine
Cmdlet          Remove-SyncJob                                     SFSyncEngine

Listing Existing Sync Jobs^

Let’s see which sync jobs are currently configured:

PS D:\> Get-SyncJobs -all
 
Id                 : 3
Account            : helgeklein.sharefile.com
FolderId           : foh61d44-2494-43c7-a61b-xxxxxxxxxxxx
User               : xxxxxx@helgeklein.com
DeviceId           :
LocalFolderPath    : D:\Daten\ShareFile\My Files & Folders
Application        : SFSyncEngine.SyncApp
Mode               : sync_up_down
Persist            : True
AuthenticationType : oauth_sharefile
CachedJobState     : job_idle

As you can see, there is only one sync job with the ID 3 configured that syncs files from the tab My Files & Folders to the local directory D:\Daten\ShareFile\My Files & Folders.

Adding a Sync Job^

I have a folder ingenuously called Shared folder in ShareFile which I want to sync to the local directory D:\Daten\Sync to ShareFile. Please note that the local directory is not a subdirectory of the base folder D:\Daten\ShareFile configured in the UI. Configuring target paths per sync folder is something you cannot currently do in the UI.

Folders are identified by their FolderId. Before we can add the sync job we need to get the id of Shared folder. To do that go to the folder in the web UI, right-click Get Direct Link and then click Copy link address:

Get Citrix ShareFile folder ID

The link looks similar to this (deliberately obfuscated):

https://helgeklein.sharefile.com/getdirectfolderlink.aspx?id=foc86c19-d904-434a-9d67-xxxxxxxxxxxx

With that information we can add the sync job:

PS D:\> Add-SyncJob -ApplicationId 1 -ApplicationName "PowerShell" -Account helgeklein.sharefile.com 
-RemoteFolderName "foc86c19-d904-434a-9d67-xxxxxxxxxxxx" -LocalFolderPath "D:\Daten\Sync to ShareFile" 
-AuthType 4 -UserName xxxxxx@helgeklein.com -SyncDirection 2 -Password "MY SHAREFILE PASSWORD"
 
Id                 : 12
Account            : helgeklein.sharefile.com
FolderId           : foc86c19-d904-434a-9d67-xxxxxxxxxxxx
User               : xxxxxx@helgeklein.com
DeviceId           :
LocalFolderPath    : D:\Daten\Sync to ShareFile
Application        : SFSyncEngine.SyncApp
Mode               : sync_up_down
Persist            : True
AuthenticationType : oauth_sharefile
CachedJobState     : job_idle

The password can alternatively be specified as a secure string:

PS D:\> $securePwd = Get-Credential xxxxxx@helgeklein.com
 
PS D:\> Add-SyncJob -ApplicationId 1 -ApplicationName "PowerShell" -Account helgeklein.sharefile.com 
-RemoteFolderName "foc86c19-d904-434a-9d67-xxxxxxxxxxxx" -LocalFolderPath "D:\Daten\Sync to ShareFile" 
-AuthType 4 -UserName xxxxxx@helgeklein.com -SyncDirection 2 -Password $securePwd.Password

The local folder will be created if it does not exist yet and the ShareFile sync engine will immediately download the cloud folder’s content to the local disk.

A description of the values used for AuthType and SyncDirection can be found below.

Removing a Sync Job^

Removing a sync job is easy. Just use the job id that was displayed when creating the job:

Remove-SyncJob 12

Useful Constants^

SyncDirection^

The parameter SyncDirection accepts numerical constants whose meaning I found by trial and error:

0: sync_up
1: sync_down
2: sync_up_down

AuthType^

The parameter AuthType accepts numerical constants whose meaning I found by trial and error:

0: sharefile
1: saml
2: win_ad
3: last_old_auth
4: oauth_sharefile [this is what the UI uses]
5: oauth_saml
6: oauth_win_ad
7: oauth_win_sso
8: oauth_saml_forms

Troubleshooting^

If something goes wrong, especially when creating sync jobs, the job’s state might change to job_queued. A detailed log can be found in %temp%\ShareFile\SyncEngine2*.log.

The post Configuring Citrix ShareFile Sync from PowerShell is original content of Helge Klein - Tools for IT Pros.
Solved: Citrix Desktop Service Fails to Start, Logs Event 1006

$
0
0

I am sure you all love XenDesktop VDAs that just won’t register. Although this is becoming less and less of a problem I had another case recently.

Checking the Obvious

When a XenDesktop VDA is unregistered the first thing I do is check if the VM is actually turned on. With that out of the way I turn to the application event log, looking for entries with the source Citrix Desktop Service. This usually tells you what the problem is. Not this time, however. Apparently the Citrix Desktop Service (aka WorkstationAgent) ran into some error during startup. It logged the following event with ID 1006 and stopped:

The Citrix Desktop Service failed to start. 
 
If this problem persists, reinstall the Citrix Virtual Desktop Agent. 
See Citrix Knowledge Base article CTX119736
 
Error details: 
Exception 'Invalid value for registry (Exception from HRESULT: 0x80040153 (REGDB_E_INVALIDVALUE))' of type 'System.Runtime.InteropServices.COMException'

Turning on the Log

I read through CTX119736 as recommended that that did not help at all. Then I tried to figure out the error details. Apparently something in the registry was amiss – but what?

Using Citrix’ LogEnabler tool I enabled logging for the WorkstationAgent. I did the same on a machine that registered correctly. Comparing the two logs I found the following error:

[   4] 03/03/14 13:28:24.4109 : Workstation Agent:Binding to AD object with default path: LDAP://CN=COMPUTERNAME,OU=OUNAME,DC=DC=DOMAIN,DC=COM
[   4] 03/03/14 13:28:24.4295 : Workstation Agent:Default binding path failed
System.Runtime.InteropServices.COMException (0x80040153): Invalid value for registry (Exception from HRESULT: 0x80040153 (REGDB_E_INVALIDVALUE))
   at System.DirectoryServices.Interop.UnsafeNativeMethods.IntADsOpenObject(String path, String userName, String password, Int32 flags, Guid& iid, Object& ppObject)
   at System.DirectoryServices.Interop.UnsafeNativeMethods.ADsOpenObject(String path, String userName, String password, Int32 flags, Guid& iid, Object& ppObject)
   at System.DirectoryServices.DirectoryEntry.Bind(Boolean throwIfFail)
   at System.DirectoryServices.DirectoryEntry.Bind()
   at System.DirectoryServices.DirectoryEntry.RefreshCache()
   at Citrix.Cds.ADSupport.ADProvider.BindToObject(String objectDN)

Maybe the registration of the System.DirectoryServices COM object was broken? As MS KB 887438 recommends I checked HKEY_CLASSES_ROOT\TypeLib\{97d25db0-0363-11cf-abc4-02608c9e7553} – which was OK. However, I suspected some other problem with registry values and created a Process Monitor trace of the service startup (which did not show anything obviously wrong, like access denied). Filtering the trace so it showed HKCR only I looked at which other keys were accessed after HKEY_CLASSES_ROOT\TypeLib\{97d25db0-0363-11cf-abc4-02608c9e7553}. Although there were no obvious problems I took a look at each of them. HKEY_CLASSES_ROOT\AppID\{4BC0A672-4AE4-4BE0-91AD-9BCDB1429785} looked suspicious:

Citrix Workerstation Agent App COM Server - empty binary values AccessPermission and LaunchPermission

For those of you not fluent in German: Binärwert der Länge Null means zero-length binary value.

Sure enough, on a working system the binary values AccessPermission and LaunchPermission were not empty! I exported the working machine’s configuration to a reg file:

Windows Registry Editor Version 5.00
 
[HKEY_CLASSES_ROOT\AppID\{4BC0A672-4AE4-4BE0-91AD-9BCDB1429785}]
@="Citrix Workerstation Agent App COM Server"
"LocalService"="WorkstationAgent"
"AccessPermission"=hex:01,00,04,80,44,00,00,00,54,00,00,00,00,00,00,00,14,00,\
  00,00,02,00,30,00,02,00,00,00,00,00,14,00,03,00,00,00,01,01,00,00,00,00,00,\
  05,0b,00,00,00,00,00,14,00,03,00,00,00,01,01,00,00,00,00,00,05,12,00,00,00,\
  01,02,00,00,00,00,00,05,20,00,00,00,20,02,00,00,01,02,00,00,00,00,00,05,20,\
  00,00,00,20,02,00,00
"LaunchPermission"=hex:01,00,04,80,30,00,00,00,40,00,00,00,00,00,00,00,14,00,\
  00,00,02,00,1c,00,01,00,00,00,00,00,14,00,09,00,00,00,01,01,00,00,00,00,00,\
  05,0b,00,00,00,01,02,00,00,00,00,00,05,20,00,00,00,20,02,00,00,01,02,00,00,\
  00,00,00,05,20,00,00,00,20,02,00,00

Once I had imported that into the faulty machine’s registry the Citrix Desktop Service started correctly and registered without a hitch.


Citrix ShareFile Sync on a New Computer with Existing Data

$
0
0

Switching over to a new computer is certainly fun for a geek, but getting back to a perfectly tuned configuration can be a lot of work, whether you synchronize (part of) your data to the cloud or not.

Migrating Data

What I like to do is simply copy all my data over. What used to be an easy (although lengthy) process has become more complicated with the use of tools that synchronize some part of my directory structure with their respective cloud. When I moved to my current PC just recently I was using two such tools: TeamDrive (which I use as a virtual file server for sensitive data due to its client-side encryption) and ShareFile. The interesting question is, of course, how the sync tool handles data that already exists locally.

TeamDrive

In case of TeamDrive the process was fairly painless. Its sync client has a feature to tell it you already have the data so it need not download everything. Just make sure everything is in sync and keep it that way.

Then I installed the ShareFile Sync client for Windows. That proved to be a tougher nut to crack.

ShareFile Sync for Windows

First of all, it creates your local sync directory in %UserProfile%\ShareFile – not exactly my favorite location – and immediately starts synchronizing. Next, when you try to do the obvious thing and configure ShareFile to sync to your previous data directory it complains about the directory not being empty with the message “you can only sync to an empty folder”:

Citrix ShareFile Sync - Folder not empty

Personal Folder / My Files & Folders

So I turned to PowerShell and used the information I published earlier to configure that sync job manually: I deleted the auto-created sync job and recreated it with the desired target directory. While the PowerShell commands did not give me any error the Sync engine did not seem to be too happy with what I had done. It went on strike and refused to acknowledge the new sync job:

Citrix ShareFile Sync - no sync jobs

I had to delete the entire client state in %AppData%\ShareFile and %LocalAppData%\ShareFile to get it to cooperate again. I accepted the inevitable, deleted my local copy of the synchronized data and had ShareFile re-download everything. With that I had My Files & Folders back in a synchronized state.

Deleting the Default Local Personal Folder Sync Target

Once you have moved the synchronization target from the default to a directory of your choosing you might feel the inclination to delete the directory created automatically in the root of the user profile. That proves to be more difficult than necessary because ShareFile Sync alters the default file system permissions so that even administrators have only read access:

D:\>SetACL.exe -on C:\Users\helge\ShareFile -ot file -actn list
 
C:\Users\helge\ShareFile
 
   DACL(protected+auto_inherited):
   SYSTEM           full                                 allow   container_inherit+object_inherit
   Administrators   read_execute+WRITE_OWNER+WRITE_DAC   allow   container_inherit+object_inherit
   HKW540\helge     read_execute+WRITE_OWNER+WRITE_DAC   allow   container_inherit+object_inherit

The same does not happen with the custom sync directory, the sync client luckily leaves its permissions as they are.

Shared Folders

As described earlier I had several shared folders configured to sync to different directories on my hard drive, some of which are quite big. I tried again with those sync jobs, and voilà, that worked without a hitch. Note: for each shared folder use a command like the following:

Add-SyncJob -ApplicationId 1 -ApplicationName "PowerShell" -Account helgeklein.sharefile.com 
-RemoteFolderName "xxxxxx-xxxx-xxxx-xxxx-xxxxxxx" -LocalFolderPath "D:\Some local directory" 
-AuthType 4 -UserName xxxxxx@helgeklein.com -SyncDirection 2 -Password "MY PASSWORD"

The ShareFile Sync client examined the local data, found it to be in sync, and that was it.

Conclusion

Apparently the ShareFile Sync client currently does not support initial synchronization of the personal folder with an existing local directory. But the same works flawlessly for additional shared folders.

Is my App Running on Citrix XenDesktop/XenApp?

$
0
0

How do you programmatically determine if an application is running in a session accessed over a remoting protocol (i.e. ICA aka HDX or RDP)? It may be Citrix’ strategy to completely hide the fact that a session is remoted – which makes sense in many ways – but in some cases developers simply need to know in order to optimize their applications. It is surprisingly difficult to find official documentation about this. Here is what you need to know.

Machine or Protocol?^

Often, when people pose a question related to our topic they ask how to find out whether an application is “running on Citrix”. I freely admit that I did the same in the title – in order to be found by people asking the question in exactly that way.

But actually the question is wrong. It should be: “is the session my application is running in being remoted?”

Typically what developers want to know is whether to optimize their applications for remoting protocols, e.g. by replacing animations with static images and other similar things. It certainly is a good enough approximation to assume that all sessions on Citrix XenApp or Microsoft RDS are remoted (console sessions should be very rare and not really relevant since they are limited to administrators). The same is true of (traditional) XenDesktop sessions, too. But there are variants of XenDesktop, called Remote PC, where the ICA/HDX remoting protocol is being used to access physical PCs normally used directly via the console. In other words, with Remote PC employees sometimes sit directly in front of their PCs, and sometimes they use their PCs via ICA. Same machine, same user, same session. You want to be able to distinguish between the two.

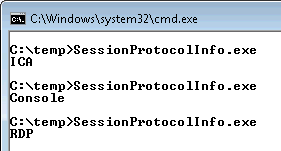
SessionProtolInfo - ICA, RDP and Console

Citrix XenApp and Microsoft RDS^

How to Find Out if a Session is Being Remoted^

The Windows API function WTSQuerySessionInformation tells you whether a specific session is displayed locally on the console or remoted via Citrix ICA/HDX or Microsoft RDS.

Call WTSQuerySessionInformation with the third parameter set to WTSClientProtocolType. The function returns:

  • 0 for console sessions
  • 1 for ICA sessions
  • 2 for RDP sessions

Interestingly the return value of 1 is not documented as WTS_PROTOCOL_TYPE_ICA on MSDN any more, but as “This value is retained for legacy purposes.” If I remember correctly that was different 5-10 years ago.

Where it Works^

WTSQuerySessionInformation works on any version of Windows beginning with XP / Server 2003, but it does not correctly identify ICA with XenDesktop (see below).

Citrix XenDesktop^

XenDesktop’s architecture is different from XenApp in that it makes the OS think the session is displayed locally instead of being remoted. From the point of view of Windows the session is being displayed on the console. It does not know that the console is “redirected” by means of the ICA/HDX protocol. That is the reason why WTSQuerySessionInformation returns a value of 0 (console) for XenDesktop sessions.

How to Find Out if a Session is Being Remoted^

To determine whether a XenDesktop session is being remoted we need to dig deep and utilize one of Citrix’ legacy API functions. The WinFrame API SDK (WFAPI) comes with function the WFGetActiveProtocol, a function so totally undocumented that a Google search for its name returns only a single result (as of 2014-07-31). But at least it is officially part of the SDK and very easy to use. It returns the same values as WTSQuerySessionInformation:

  • 0 for console sessions
  • 1 for ICA sessions
  • 2 for RDP sessions

Where it Works^

WFGetActiveProtocol correctly identifies the protocol in all the configurations we tested except Windows 7 with the XenDesktop 5.6 VDA accessed via RDP. In that case WFGetActiveProtocol returns 0 (console) instead of 2 (RDP).

Of course, being part of a Citrix API, WFGetActiveProtocol requires Citrix XenApp or XenDesktop to be installed. To be more precise it needs wfapi.dll (wfapi64.dll for 64-bit processes).

Putting it All Together^

If you want to be able to identify the remoting protocol on any version of Windows, with and without Citrix XenApp or XenDesktop installed, you need to do the following:

  1. Call WTSQuerySessionInformation. If that returns 1 or 2 (ICA or RDP), you are done.
  2. If WTSQuerySessionInformation returns 0 (Console), dynamically load wfapi.dll (64-bit processes load wfapi64.dll instead) and get the address of WFGetActiveProtocol
  3. Call WFGetActiveProtocol with a parameter of WF_CURRENT_SESSION, which is defined as ((DWORD)-1)
  4. The return value of WFGetActiveProtocol is the session type. It should be either 0 (Console) or 1 (ICA)

C++ Example Code^

The following is essentially the source code of SessionProtocolInfo. If you are looking for a compiled tool instead you can simply download SessionProtocolInfo here.

#include "stdafx.h"
 
#pragma comment (lib, "wtsapi32.lib")
 
#define WF_CURRENT_SESSION ((DWORD)-1)
 
int _tmain(int argc, _TCHAR* argv[])
{
   UNREFERENCED_PARAMETER (argc);
   UNREFERENCED_PARAMETER (argv);
 
   LPTSTR   buffer = 0;
   DWORD    bytesReturned = 0;
   DWORD    retVal = ERROR_SUCCESS;
   DWORD    protocolId = 0;
 
   // First use Microsoft's official API function
   if (! WTSQuerySessionInformation (WTS_CURRENT_SERVER_HANDLE, WTS_CURRENT_SESSION, WTSClientProtocolType, &buffer, &bytesReturned))
   {
      retVal = GetLastError ();
      goto CleanUp;
   }
   protocolId = (USHORT) *buffer;
 
   // If the WTS API returns "console" check Citrix' API, it might be a  XenDesktop session
   if (protocolId == 0)
   {
      typedef int (WINAPI* WFGetActiveProtocol) (IN DWORD SessionId);
      WFGetActiveProtocol funcWFGetActiveProtocol = NULL;
 
      // Dynamically load wfapi.dll
      HMODULE dll = LoadLibrary (L"wfapi.dll");
      if (dll == NULL)
      {
         retVal = GetLastError ();
         if (retVal == ERROR_MOD_NOT_FOUND)
            goto ProtocolDetermined;
         else
            goto CleanUp;
      }
 
      // Get the address of the function needed
      funcWFGetActiveProtocol = (WFGetActiveProtocol) GetProcAddress (dll, "WFGetActiveProtocol");
      if (funcWFGetActiveProtocol == NULL)
      {
         retVal = ERROR_INVALID_FUNCTION;
         goto CleanUp;
      }
 
      protocolId = funcWFGetActiveProtocol (WF_CURRENT_SESSION);
   }
 
ProtocolDetermined:
 
   if (protocolId == 0)
      _tprintf (L"Console\n");
   else if (protocolId == 1)
      _tprintf (L"ICA\n");
   else if (protocolId == 2)
      _tprintf (L"RDP\n");
   else
      _tprintf (L"Unknown: %d\n", protocolId);
 
CleanUp:
 
   if (buffer)
   {
      WTSFreeMemory (buffer);
      buffer = NULL;
   }
 
	return protocolId;
}

For completeness sake here is also the content of stdafx.h:

#pragma once
 
#include "targetver.h"
 
#include <stdio.h>
#include <tchar.h>
 
#include <Windows.h>
#include <WtsApi32.h>

Tools Using WFGetActiveProtocol^

Download SessionProtocolInfo here

Which Version of Citrix GoToMeeting Are You Running?

$
0
0

Am I running the latest version of GoToMeeting? Which is the latest version, anyway? Those trivial questions might not be easy to answer.

When hovering over the GoToMeeting icon in the taskbar it tells me I am running version 6.3.1:

GoToMeeting version shown in taskbar

When I check in Programs and Features I appear to have version 6.4.4. installed:

GoToMeeting version shown in programs and features

Automatic updates are enabled (Preferences -> Start Up):

GoToMeeting automatic updates

Clicking that link opens a webpage listing 6.4.3 as the latest version:

GoToMeeting version shown on website

This is more difficult than expected.

Installer Woes

I start GoToMeeting through this start menu link:

GoToMeeting start menu shortcut

It points to an executable in the folder C:\Users\helge\AppData\Local\Citrix\GoToMeeting\1468.

Taking a look at the parent of that directory reveals that there seem to be many different versions of GoToMeeting on my disk, each taking up around 29 MB, totaling 290 MB (on a machine installed just a few months ago!):

GoToMeeting directories on disk

Most of the confusion seems to come from two flaws in GoToMeeting’s installer:

  • For each new version it just adds a new folder, never removing old versions
  • It does not (always) update the start menu link

Fixing it

I “upgraded” GoToMeeting to the latest version by changing the directory the start menu link pointed to to the one with the largest number (1831). Then I deleted all the other subdirectories of C:\Users\helge\AppData\Local\Citrix\GoToMeeting. That had the nice side-effect of freeing about 260 MB on my hard disk (and from my user profile).

It might be a good idea to check that directory again in a few months…

The post Which Version of Citrix GoToMeeting Are You Running? appeared first on Helge Klein.

XenDesktop 7.6 VDA CPU & Memory Footprint

$
0
0

If you install the Citrix XenDesktop 7.6 Virtual Desktop Agent (VDA) on a small Windows 7 VM, you may be in for a big surprise, and not a good one. This article documents issues I have experienced and how to work around them.

Starting Point

I started with Windows 7 x64 in a Generation 1 VM on Windows 8.1 Client Hyper-V. The machine had 1 vCPU, Dynamic Memory enabled, startup RAM and minimum RAM were both at 512 MB. I had used this configuration for quite some time without any problems. Method of access: RDP (using Royal TS).

Then I installed the VDA from the XenDesktop 7.6 ISO in Remote PC mode, not choosing HDX 3D Pro.

Gray Screen After Logon

When I tried to log on after the mandatory reboot all I got was a gray screen surrounded by black:

XenDesktop 7.6 VDA gray screen with black border

The session was not dead at all, it showed as active in Citrix Studio and I could log the user off from there. But the desktop never appeared.

I noticed high CPU usage of ctxgfx.exe. If I am not mistaken that is the process responsible for H.264-encoding the display graphics. Apparently that task is a bit much for a single vCPU. To get the VDA to play nicely two policy settings are required:

  • Desktop Composition Redirection: disabled
  • Legacy Graphics Mode: Enabled

Black Border Around Desktop

With those two policy settings in place things were much better: I was able to actually see the desktop and interact with it:

XenDesktop 7.6 VDA desktop with black border

However, the black border remained.

As it turned out this issue is documented in CTX200073. The root cause of the black border is that the Citrix WDDM display driver tries to allocate 128 MB of memory during system startup. If that fails, you get the black border.

In my case the proposed solution from the Citrix KB article does not apply. There is simply not enough RAM available during boot. Increasing the Startup RAM of the VM from 512 MB to 1024 MB fixed the problem.

Citrix VDA Memory Usage

I took this as an opportunity to take a closer look at the VDA’s memory usage. Our uberAgent monitoring product has a useful dashboard for this task. It displays all the running applications along with their CPU/memory/disk/network footprint. Take a look at this screenshot where the red arrows highlight applications that are part of the XenDesktop 7.6 Virtual Desktop Agent:

XenDesktop 7.6 VDA memory usage

The total RAM footprint of the VDA is a whopping 374 MB (a few minutes after boot). That is huge! And this does not even include drivers running in kernel space!

Conclusion

I remember talking with Citrix’s Juliano Maldaner at BriForum Amsterdam 2007 about the planned new architecture (then only a concept, now called FMA). One of the goals was to separate workers and controllers and not install the full product on the workers but only a light-weight agent. Well, that may not have worked out, after all. Installing XenApp 6.5 probably increases the memory footprint less than installing the XenApp/XenDesktop 7.6 VDA.

The post XenDesktop 7.6 VDA CPU & Memory Footprint appeared first on Helge Klein.

Citrix XenApp 7.6 Logon Slow – Long Black Screen Phase

$
0
0

Update 2015-04-28: Citrix provides the limited release hotfix ICATS760WX64009 that fixes this issue. More information below.

During the research for my session about the XenApp 7.6 logon process, to be presented at Citrix Synergy and BriForum London, I noticed that the logon to my XenApp 7.6 lab server was taking a bit long. Longer, in fact, than the combined durations of the main logon phases user profile loading, group policy processing, logon script execution and shell startup. Much longer. Also much longer than on an otherwise similar XenApp 6.5 machine.

Examining uberAgent’s brand-new logon process performance dashboard I found a 10 second gap:

uberAgent- XenApp 7.6. slow logon gap

After the user profile has been loaded and group policy has been processed, which are both finished after three seconds, nothing happens for about ten seconds. Finally, at 13 seconds into the login is the Userinit process started which ultimately loads the shell, Explorer.exe. During most of that time the end user is presented with a black screen, getting no feedback as to what might or might not be happening as you can see in this video:

I experiemented a lot trying to find the root cause of the prolonged black screen phase, disabling all kinds of redirection, printer mapping, even IPv6. None of that fundamentally changed the duration of the black screen phase. Then I had the idea to log in via RDP (for which you have to make the user a member of the group Direct Access Users on the XenApp machine):

Now, that is a lot faster! RDP logons are finished in less than 4 seconds compared to around 14 seconds for ICA logons.

Digging around some more I stumbled upon CTX135782 which suggests setting the following registry value:

Key: HKEY_LOCAL_MACHINE\SOFTWARE\Wow6432Node\Citrix\Logon
Value: DisableStatus
Type: REG_DWORD
Data: 1

The effect was immediate, bringing the ICA logon from 14 seconds down to around 5.

Happy End?

Not quite. With DisableStatus set to 1, every time I logged on the LogonUI.exe process crashed due to a fault in the module CtxWinlogonProv.dll. Events like the following were logged:

Faulting application name: LogonUI.exe, version: 6.3.9600.16384, time stamp: 0x5215f6c5
Faulting module name: CtxWinlogonProv.dll_unloaded, version: 7.6.0.5018, time stamp: 0x541cfd05
Exception code: 0xc0000005
Fault offset: 0x00000000000019e1
Faulting process id: 0x1e2c
Faulting application start time: 0x01d080da8b0d6ae2
Faulting application path: C:\Windows\system32\LogonUI.exe
Faulting module path: CtxWinlogonProv.dll
Report Id: cb285960-eccd-11e4-80c0-00155d001b10
Faulting package full name:
Faulting package-relative application ID:

CtxWinlogonProv.dll, also called CitrixRemoteLogonFilter, is registered as a credential provider filter via the registry key HKEY_LOCAL_MACHINE\SOFTWARE\Microsoft\Windows\CurrentVersion\Authentication\Credential Provider Filters\{3571A91D-713C-427c-AA0C-BBF4F618A819}. When that key is renamed or deleted LogonUI.exe does not try to load CtxWinlogonProv.dll and consequently does not crash any more while logons are still fast.

However, since I do not know what the consequences of disabling the registration of CtxWinlogonProv.dll are I cannot really recommend that approach. Ultimately Citrix are the only ones who can truly fix this.

Update 2015-04-28: a Hotfix

Shortly after the initial publication of this article Shane Kleinert pointed me to limited release hotfix ICATS760WX64009 (CTX142036) which seems to be available for server OS (i.e. XenApp) only. As he explains in the comments below Shane had noticed similar issues at customer sites and found CTX142036 in spite of the more than vague problem description.

I am happy to report that CTX142036 fixed this long black screen phase issue on my machines, too. So this story does have a happy end, after all!

The post Citrix XenApp 7.6 Logon Slow – Long Black Screen Phase appeared first on Helge Klein.

Citrix Desktop Viewer Screen Resolution and Window Size

$
0
0

As far as I know there is no “official” way to set the width, height and screen position of Citrix Desktop Viewer in window mode. It can be done easily by changing a few registry values, though.

To set the window size (including title bar, borders, etc.) modify the following registry values:

[HKEY_CURRENT_USER\Software\Citrix\XenDesktop\DesktopViewer\SUBKEY]
"WindowedBoundsLocationX"=dword:00000000
"WindowedBoundsLocationY"=dword:00000000
"WindowedBoundsSizeWidth"=dword:00000500
"WindowedBoundsSizeHeight"=dword:000002d0

Above values will put the Desktop Viewer window in the top left corner and set an outer size of 1280×720.

Notes: You need to replace SUBKEY with the internal name of the published resource. The easiest way to do that is check the registry of a user who has already connected to that resource. And yes, this works for XenApp and XenDesktop.

To find the screen resolution of the XenApp/XenDesktop session right-click the desktop and select Screen resolution. The dialog that comes up shows you the net size that remains after the Desktop Viewer window borders have been subtracted (1264×656 in this case):

Citrix Desktop Viewer - window size 1280x720

The post Citrix Desktop Viewer Screen Resolution and Window Size appeared first on Helge Klein.

Citrix XenApp/XenDesktop API Hooking Explained

$
0
0

What is API Hooking?

API hooking is all about making others do things they never even knew they could do. More precisely: tricking other processes into doing things differently from what their developers programmed.

API hooking is done in two steps: first, you need access to another process’ memory. Second you manipulate memory addresses so that whenever the other process wants to call certain operating system API functions, your code is called instead. Let’s explain this in more detail.

Getting Access: AppInit_DLLs

Getting access to the memory of another process can be tricky. It is by far easier to use a technique not too dissimilar to a trojan horse and have your code automatically loaded into all processes created in the system. That is exactly what AppInit_DLLs does.

AppInit_DLLs has been part of Windows since the dawn of time. Because tampering with unsuspecting processes can have severe security and stability implications Microsoft disabled the functionality by default starting with Vista, but enabling it is as simple as changing a registry value (LoadAppInit_DLLs).

Technically, AppInit_DLLs is a registry value located in HKEY_LOCAL_MACHINE\SOFTWARE\Microsoft\Windows NT\CurrentVersion\Windows. By default it is empty. When User32.dll initializes, it reads the AppInit_DLLs registry value and loads all DLL names it finds in that value into memory. As User32.dll is one of the most common Windows DLLs this basically affects every single process.

Think of AppInit_DLLs as a free delivery mechanism that puts your code right into the heart of all processes running on your Windows machine. But wait: I explained how you can get your DLL loaded into another process’ memory, but how do you make that other process execute your code so that you can install the API hook? Easy: whenever a DLL is loaded, the OS automatically calls the DllMain function of the DLL. That is where you install the hook.

The Hook

When processes need to do basic stuff like reading from a file, sending data across the network or accessing the registry, they call an API function provided by the operating system for that task. This might happen through multiple layers, but eventually there is always an API function that does the job. This is true for every programming language, including runtime environments like .NET and Java.

If you control how a process accesses the operating system APIs, you control the information flowing in and out of the process. You also control what that process is doing.

Here is an example: you want to capture a process’ registry activity? Simple; hook the registry API functions. Whenever the process tries to open a key or change a value, your code is called and you can log the activity. Then you call the original API function – you do not want to intrude, you just want to know what is going on.

But you could just as well change parameters before making the API call. Redirecting from HKLM to HKCU is as simple as changing a single parameter. The hooked process would never know what happened.

So how do we install our hooks? The typical way of calling operating system API functions is through an import address table (IAT). When the compiler generates code it does not know at which memory addresses in the OS DLLs the API functions will be located on the user’s machine, so it uses dummy addresses. These are replaced with the real addresses by the Windows DLL loader. To keep this process simple a lookup table is used, the IAT.

Installing the hook involves locating the entry for the API function to be hooked in the IAT. Then you replace it with the address of a function in your DLL. Done. From now on your code is called instead of, say, RegOpenKeyEx.

Citrix’ Way of Hooking

Remoting applications and desktops is no small feat, and Citrix needs many different hooks in order to pull it off. To simplify management a single hook DLL, Mfaphook.dll is added to the AppInit_DLLs registry value when the XenApp/XenDesktop VDA is installed. Actually, two hook DLLs are added:

  • Mfaphook.dll to the 32-bit registry: HKLM\SOFTWARE\Wow6432Node\Microsoft\Windows NT\CurrentVersion\Windows\AppInit_DLLs
  • Mfaphook64.dll to the 64-bit registry: HKLM\SOFTWARE\Microsoft\Windows NT\CurrentVersion\Windows\AppInit_DLLs

These two AppInit_DLLs registry values ensure that Mfaphook[64].dll is loaded into practically all processes created on machines with XenApp/XenDesktop installed. However, depending on the host process entirely different hooks are required. That is why Citrix has implemented a flexible configuration scheme to specify which hook DLLs are loaded into which processes. Mfaphook[64].dll reads that configuration from the registry key HKLM\SOFTWARE\Citrix\CtxHook\AppInit_Dlls:

Citrix XenApp API hook configuration

As you can see above there is one registry key below the AppInit_DLLs key per hook. Each hook’s key has a FilePathName value that contains the path and name of the hook DLL to be loaded. Optional subkeys control which processes the hook DLL is loaded into; no subkey stands for all processes.

Disabling Hooks

API Hooks change the way an application operates. Due to that nature hooks may cause problems. If you experience weird application malfunctions it might be a good idea to test with some or all hooks disabled.

Disabling API Hooking

To disable API hooking altogether set the value LoadAppInit_DLLs to 0 (REG_DWORD).

HKLM\SOFTWARE\Microsoft\Windows NT\CurrentVersion\Windows\LoadAppInit_DLLs = 0 [REG_DWORD]

Disabling Citrix Hooks

To disable specific Citrix hooks set the Flag value below the hook’s registry key to 0 (REG_DWORD), e.g. to disable the multi monitor hook:

HKLM\SOFTWARE\Citrix\CtxHook\AppInit_Dlls\Multiple Monitor Hook\Flag = 0 [REG_DWORD]

Disabling Citrix Hooks for one Executable

To disable all Citrix hooks for specific executables create a comma-separated list of executable names in the string value ExcludedImageNames, e.g.:

HKLM\SOFTWARE\Citrix\CtxHook\ExcludedImageNames = calc.exe,notepad.exe [REG_SZ]

List of all Citrix Hooks

XenApp 7.6: 64-Bit Hooks

The following table lists all hooks loaded into 64-bit processes.

Hook name Hook DLL Processes to hook Description
CreateProcessHook CreateProcessHook64.dll explorer.exe, tabtip.exe
CtxMFPlugin CtxMFPlugin64.dll * Media player
CtxNotif Launcher ctxnflau64.dll winlogon.exe
Flash Legacy sphook64.dll iexplore.exe
Graphics Helper CtxGraphicsHelper64.dll * GPU sharing
Multiple Monitor Hook mmhook64.dll *
Seamless Explorer explhook64.dll explorer.exe Prevents published Explorer from displaying a full desktop
SfrHook Sfrhook64.dll * Special folder redirection
Shell Hook ShellHook64.dll * Support for FlashWindow() API
Smart Card Hook scardhook64.dll *
UPD Printer hook cpprov.dll spoolsv.exe
UPS win32Spl hook Win32SplHook.dll spoolsv.exe
VIPHook viphook64.dll * Virtual IP address hook (CTX125506)

XenApp 7.6: 32-Bit Hooks

The following table lists all hooks loaded into 32-bit processes.

Hook name Hook DLL Processes to hook Description
ActiveSync asynchook.dll rapimgr.exe, wcescomm.exe, WCESMgr.exe
CreateProcessHook CreateProcessHook.dll explorer.exe, tabtip.exe
CtxMFPlugin CtxMFPlugin.dll * Media player
Flash Legacy sphook.dll iexplore.exe
Graphics Helper CtxGraphicsHelper.dll * GPU sharing
HDXMediaStreamForFlash HdxFlashHook.dll iexplore.exe
Multiple Monitor Hook mmhook.dll *
Seamless Explorer explhook.dll explorer.exe Prevents published Explorer from displaying a full desktop
SfrHook Sfrhook.dll * Special folder redirection
Shell Hook ShellHook.dll * Support for FlashWindow() API
Smart Card Hook scardhook.dll *
Twain Hook twnhook.dll * Communicates with CtxTwnPA.exe on the client through a virtual channel
VIPHook viphook64.dll * Virtual IP address hook (CTX125506)

XenDesktop 7.6: 64-Bit Hooks

The following table lists all hooks loaded into 64-bit processes.

Hook name Hook DLL Processes to hook Description
CreateProcessHook CreateProcessHook64.dll explorer.exe, tabtip.exe
FullScreenHook picaFullScreenHookX64.dll * Citrix HDX 3D for Pro Graphics Full Screen Hook
Multiple Monitor Hook mmhook64.dll control.exe, explorer.exe, logonui.exe, rundll32.exe, SelfService.exe
PicaFusChoiceDialogHook PicaFusChoiceDialogHook64.dll rundll32.exe Citrix PortICA Fast User Switching Choice Dialog Hook DLL
PicaWaveHook PicaWaveHook64.dll * Citrix PortICA Wave Audio Hook DLL
PicaWinlogonHook PicaWinlogonHook64.dll winlogon.exe Citrix PortICA Winlogon Hook DLL
Seamless Explorer explhook64.dll explorer.exe, userinit.exe Prevents published Explorer from displaying a full desktop
Shell Hook ShellHook64.dll * Support for FlashWindow() API
Smart Card Hook SCardHook64.dll *
UI Tweak picaUiTweakHook64.dll explorer.exe, rundll32.exe, SystemPropertiesAdvanced.exe, SystemPropertiesPerformance.exe, winlogon.exe Citrix UI Preferences Hook
Unicode Injection IME Hook cxinjime64.dll *
UPD Printer hook cpprov.dll spoolsv.exe
UPS win32Spl hook Win32SplHook.dll spoolsv.exe
WTS Hook PicaWtsHook64.dll *

XenDesktop 7.6: 32-Bit Hooks

The following table lists all hooks loaded into 32-bit processes.

Hook name Hook DLL Processes to hook Description
CreateProcessHook CreateProcessHook.dll explorer.exe, tabtip.exe
CtxMFPlugin CtxMFPlugin.dll firefox.exe, iexplore.exe, lync.exe, realplay.exe, wmplayer.exe Media player
FullScreenHook picaFullScreenHookX86.dll * Citrix HDX 3D for Pro Graphics Full Screen Hook
HDXMediaStreamForFlash HdxFlashHook.dll iexplore.exe
Multiple Monitor Hook mmhook.dll control.exe, explorer.exe, logonui.exe, rundll32.exe, SelfService.exe
PICA Passthrough picaPassThruHook.dll wfica32.exe
PicaFusChoiceDialogHook PicaFusChoiceDialogHook.dll rundll32.exe Citrix PortICA Fast User Switching Choice Dialog Hook DLL
PicaWaveHook PicaWaveHook.dll * Citrix PortICA Wave Audio Hook DLL
PicaWinlogonHook PicaWinlogonHook.dll winlogon.exe Citrix PortICA Winlogon Hook DLL
Seamless Explorer explhook.dll explorer.exe, userinit.exe Prevents published Explorer from displaying a full desktop
Shell Hook ShellHook.dll * Support for FlashWindow() API
Smart Card Hook SCardHook.dll *
Twain Hook twnhook.dll * Communicates with CtxTwnPA.exe on the client through a virtual channel
UI Tweak picaUiTweakHook.dll explorer.exe, rundll32.exe, SystemPropertiesAdvanced.exe, SystemPropertiesPerformance.exe, winlogon.exe Citrix UI Preferences Hook
Unicode Injection IME Hook cxinjime.dll *
WTS Hook PicaWtsHook.dll *

Fun Fact

Did you notice that Citrix is hooking one of their own processes on XenDesktop? The VDA hooks Receiver (wfica32.exe). It would most likely have been better to talk to the developers on the Receiver team and ask them to change some of their code. Hooking might achieve the same goal, but in a much less friendly way.

The post Citrix XenApp/XenDesktop API Hooking Explained appeared first on Helge Klein.


Citrix Synergy 2016 Call for Topics: Get Rid of the Video Requirement (Open Letter)

$
0
0

It smacks of lazy reviewers looking for eye-candy. Simon Crosby, former Citrix CTO

Citrix Synergy Team,

I am writing to you as a guy who has presented many times at Synergy. This year alone I had three sessions, one in cooperation with my community peers Aaron Parker and Shawn Bass, the other two on my own – one in the Geek Speak track, the other in the regular Synergy breakout session track. All three sessions were a great success and have been rated highly.

That might change in the coming year: I might not be able to present. The new requirement, asking for a five minute video describing the session, is too much.

I am not sure if you are aware of the amount of work that goes into one of my sessions. It is enormous and typically involves several weeks of full-time committment. But it starts way earlier; before I can work on a session, I have to submit proposals. That sounds like an easy task. After all, proposals are short. But it is not. A lot of thought goes into those 150 words that are allowed for the session description. They have to be spot on, or all I get back is a polite reply saying there was just too much great content to choose from.

Don’t get me wrong; I understand many people want to present at a popular conferency like Synergy. There definitely is a lot of competition and you want to get the best of the best. So why not make it even harder to get in by asking for something that is incredibly hard to do well: sales pitch. Of your session. On video. 5 minutes minimum length.

Did I mention speakers do not receive financial compensation for their efforts? Do you know that even seasoned speakers like myself typically need to submit multiple proposals to get one accepted? Are you aware that the people you should want to submit proposals are at the same time those who are most busy – because they are the best?

Sorry, this just does not compute.

Reboot. Please!

Thanks for your consideration,
Helge

P.S.: If you are reading this and do not know what it is all about: it is about this sentence in the 2016 call for topics: “New this year, you also are required to include a five-minute video describing your session topic”.

The post Citrix Synergy 2016 Call for Topics: Get Rid of the Video Requirement (Open Letter) appeared first on Helge Klein.

VMware Horizon in a Lab: Getting Rid of SSL Errors

$
0
0

This is a description of a quick and dirty way to get SSL to work correctly in a VMware Horizon View installation in a lab environment. Do not do this in production!

The Situation

The Horizon View Connection Server installer creates a self-signed certificate which it places in the computer’s personal certificate store. This certificate’s root is not trusted by anyone, least of all by the clients trying to connect to your apps and desktops.

Establishing Trust

To make the default self-signed certificate work correctly you need to export it from the computer’s personal certificate store and then re-import it in the trusted root certificate store.

Exporting

Exporting VMware Horizon self-signed certificate

It is OK to export without a private key; leave the file format at the default.

Importing – Connection Server

When re-importing the key on the Horizon View Connection Server manually select the computer’s Trusted Root Certification Authorities store:

Importing VMware Horizon self-signed certificate as root certificate

After the import restart the Connection Server machine. View Administrator should now display the Connection Server status in green (certificate valid):

VMware Horizon Connection Server details

Importing – Clients

Clients that connect to Horizon need the certificate imported as trusted root certificate in the same way as described for the Connection Server above.

Name Resolution

Clients connecting to Horizon View need to be able to resolve the name as it is stored in the certificate, in all likelihood fully qualified. If your (lab) clients use a different DNS server than the Horizon installation the simplest solution is to add the Connection Server’s name and IP address to each client’s hosts file.

The post VMware Horizon in a Lab: Getting Rid of SSL Errors appeared first on Helge Klein.

Leaked Token Handles Preventing RDS Session ID Reuse

$
0
0

A recent article on Microsoft’s Ask the Directory Services Team blog piqued my interest. It talks about how leaked access tokens prevent logon sessions to be freed when the user logs off. This wastes system resources that can only be reclaimed by rebooting. A symptom of this happening is that RDS session IDs are not reused.

What are Leaked Token Handles?

When applications need to work with kernel objects they request a handle to the object by way of calling an API function. Having received a handle, an application is supposed to call the CloseHandle API function once it is done with it. The OS keeps track of the handles handed out. As long as there is still an open handle to an object, that object is not destroyed and consequently its resources are not freed. A process object, for example, lingers in memory until the last handle to it has been closed.

When application developers “forget” to close a handle, that handle remains valid even though the application is not using it any more. The handle has leaked.

Leaks are pretty bad as they prevent system resources from being freed and reused. In the case of access tokens they unnecessarily keep obsolete logon sessions and associated RDS session IDs around as zombies.

Logon Sessions and RDS Session IDs

Whenever the local security authority (LSA) authenticates a user, a new logon session is created. Logon types can be any of the following: interactive, remote interactive, service, network, etc.

Logon sessions are associated with RDS session IDs. An easy way to examine this is to run Sysinternals’ logonsessions.exe. Output looks like this:

[9] Logon session 00000000:000fd2f5:
    User name:    HK\Helge
    Auth package: Negotiate
    Logon type:   RemoteInteractive
    Session:      3
    Sid:          S-1-5-21-2684510436-795239710-1557501712-1104
    Logon time:   06.04.2017 01:16:36
    Logon server: SRV1
    DNS Domain:   HK.TEST
    UPN:          Helge@hk.test

[10] Logon session 00000000:0017c025:
    User name:    HK\test01
    Auth package: Kerberos
    Logon type:   RemoteInteractive
    Session:      4
    Sid:          S-1-5-21-2684510436-795239710-1557501712-16601
    Logon time:   06.04.2017 01:17:38
    Logon server: SRV1
    DNS Domain:   HK.TEST
    UPN:          test01@hk.test

The RDS session ID is shown as Session.

Listing Processes with Leaked Token Handles

As the logonsessions.exe output above shows session ID 4 cannot be reused because there is still a logon session referring to it. This can easily be verified by performing additional logons: every new logon gets a new RDS session ID.

Let’s find out what keeps session ID 4 from being reused. We can list processes with open handles to token 17c025 with Sysinternals’ handle.exe:

C:\>handle.exe -a 17c025

System             pid: 4      type: Directory      D84: \Sessions\0\DosDevices\00000000-0017c025
System             pid: 4      type: Token          D88: HK\test01:17c025
System             pid: 4      type: Token          D8C: HK\test01:17c025
System             pid: 4      type: Token          D90: HK\test01:17c025
System             pid: 4      type: Token          F08: HK\test01:17c025
lsass.exe          pid: 960    type: Token          804: HK\test01:17c025
lsass.exe          pid: 960    type: Token         1658: HK\test01:17c025
lsass.exe          pid: 960    type: Token         165C: HK\test01:17c025
lsass.exe          pid: 960    type: Token         1664: HK\test01:17c025
svchost.exe        pid: 1064   type: Token          48C: HK\test01:17c025
svchost.exe        pid: 1064   type: Token          4D8: HK\test01:17c025
svchost.exe        pid: 1100   type: Token          E94: HK\test01:17c025
svchost.exe        pid: 1100   type: Token         1AC8: HK\test01:17c025
svchost.exe        pid: 1424   type: Token          964: HK\test01:17c025
CtxSvcHost.exe     pid: 2148   type: Token          15C: HK\test01:17c025
svchost.exe        pid: 3164   type: Token          1E8: HK\test01:17c025
svchost.exe        pid: 2960   type: Token          3DC: HK\test01:17c025

Wow, that is a lot! Let’s wait for a little while.

Running the same command again after 10-20 minutes gives us the following:

C:\>handle.exe -a 17c025

System             pid: 4      type: Directory      D84: \Sessions\0\DosDevices\00000000-0017c025
lsass.exe          pid: 960    type: Token          804: HK\test01:17c025
svchost.exe        pid: 1064   type: Token          48C: HK\test01:17c025
svchost.exe        pid: 1064   type: Token          4D8: HK\test01:17c025
svchost.exe        pid: 1100   type: Token          E94: HK\test01:17c025
svchost.exe        pid: 1100   type: Token         1AC8: HK\test01:17c025
svchost.exe        pid: 1424   type: Token          964: HK\test01:17c025
CtxSvcHost.exe     pid: 2148   type: Token          15C: HK\test01:17c025
svchost.exe        pid: 3164   type: Token          1E8: HK\test01:17c025

Much better, but there are still 8 open token handles referencing session ID 4.

Getting RDS Session IDs to be Reused

I wanted to prove that the open token handles shown above are indeed what keeps an RDS session ID from being reused, so I closed them one by one starting with the first svchost instance:

C:\>handle -c 48C -y -p 1064

  48C: Token         HK\test01:17c025

Handle closed.

This reduced the list of open handles by one:

C:\>handle -a 17c025

System             pid: 4      type: Directory      D84: \Sessions\0\DosDevices\00000000-0017c025
lsass.exe          pid: 960    type: Token          804: HK\test01:17c025
svchost.exe        pid: 1064   type: Token          4D8: HK\test01:17c025
svchost.exe        pid: 1100   type: Token          E94: HK\test01:17c025
svchost.exe        pid: 1100   type: Token         1AC8: HK\test01:17c025
svchost.exe        pid: 1424   type: Token          964: HK\test01:17c025
CtxSvcHost.exe     pid: 2148   type: Token          15C: HK\test01:17c025
svchost.exe        pid: 3164   type: Token          1E8: HK\test01:17c025

To make sure this has no effect on the reuse of RDS session ID 4 I logged on another user. By now they were getting the session ID 6:

C:\temp>qwinsta
 SESSIONNAME       USERNAME                 ID  STATE   TYPE        DEVICE
 services                                    0  Disc
 console                                     1  Conn
>rdp-tcp#1         Helge                     3  Active
 ica-cgp#4         test01                    6  Active

So I continued closing handles. After every closed handle I logged on again, only to notice that each new session was getting an incremented session ID.

Finally there was only one open token handle left (ignoring System and LSASS):

C:\>handle -a 17c025

System             pid: 4      type: Directory      D84: \Sessions\0\DosDevices\00000000-0017c025
lsass.exe          pid: 960    type: Token          804: HK\test01:17c025
svchost.exe        pid: 3164   type: Token          1E8: HK\test01:17c025

In my testing I found that in some cases closing the last handle held open by svchost.exe would cause the other two handles (in System and lsass.exe) to be closed automatically. When that happened, the RDS session ID would be reused for the next logon.

In other cases the System and lsass.exe handles were not closed automatically, and we cannot do it manually because we get access denied trying to close System’s handle.

Missing Information

Why is it that above procedure of freeing open logon session token handles only works sometimes?

Ryan Ries, the author of the AskDS blog article I linked to above, was kind enough to provide the answer in a comment and even went to the trouble of creating the following screenshot:

As you can see, Sysinternals’ handle.exe apparently does not (always?) list all the open handles. In some cases we may get all, in others only a subset.

Conclusion

When session IDs are not being reused system resources are wasted that can only be reclaimed by rebooting the machine. Identifying the likely cause – token handle leaks – is quite easy with Sysinternal tools as was demonstrated above.

Fixing the issue is an entirely different matter altogether, unfortunately. Token leaks occur because of developer negligence and require code changes in order to go away.

Apparently Microsoft and/or Citrix have some homework to do. I tested machines with Server 2008 R2 and 2012 R2 and different versions of Citrix XenApp. RDS session IDs were not reused in a single case.

The post Leaked Token Handles Preventing RDS Session ID Reuse appeared first on Helge Klein.

Viewing all 38 articles
Browse latest View live